Friday, March 9, 2012

Cherish the day

I was awaken this morning with my love singing "Friday...Friday...gotta get down on Friday", and if you don't know what I am talking about...than you are lucky.  I guess I am lucky also cause I didn't get in the craze to make me want to listen to it a million times on youtube, unlike John.  So I didn't get it stuck in my head.  Now if he was to wake me up singing "can't get you outta my head" by kylie minogue, I would be singing it everyday for a week.  Oh Wait...now I got that stuck in my head! AHHH!!

Needless to say, I was slow getting out of bed this morning.  Last night Eleanor fell asleep by herself in her crib (great accomplishment) but it was at 12:45.  Slowly but surely I will break her of the habit of sleeping in our bed.  I am getting better at putting her in there more often.  When the day finally comes that she is sleeping in her crib by 9 or 10 o'clock I won't know what to do with all the time on my hands, or all the items on my list!  I will have PLENTY to do.  For now I will cherish all the snuggles I can from my beautiful little girl. I love being able to kiss these little fingers whenever I can. 


I make sure I get them from Nolan also, and I cherish them just as much cause he is an awesome snuggler and hugger.  He is such a lover.


These two lovelies pull at all of my heart strings.  Kids just do something wonderful for your soul.  I am lucky to be their mother.

Have a great Friday everyone!

Monday, March 5, 2012

Fit and Fabulous!

Hello Everyone!

I love Tracy Anderson! Well, love might a strong word, but I do really really like her workouts and her upbeat attitude. I happened to stumble upon her while doing a dance aerobic search on youtube. I found a 2 part workout that I tried to do but couldn't keep up with it (I will one day though!!) and I also found one of her arm workouts, a quick one of 5 or 6 mins, which I do periodically at work.

I just had a baby girl last August and after I was ok to workout and baby E was letting me sleep more, I started doing the post-pregnancy DVD and about 20 mins of the dance cardio I. This was in the last few weeks of me being on maternity leave and I have to say I was loving the results. My pooch was getting smaller and people were actually complimenting me on looking so good after having a baby. Then I went back to work and all of my free time to work out flew out the window!

BUT I AM RECLAIMING MY TIME AND MY BODY!!!!

I am tired of not feeling good about myself and making excuses and not following through with anything. So I purchased the 30 day method book, and I am using it as a guide to help me get back to me. I can't follow it verbatim because I am nursing 100% right now, I can let it guide me back to a healthier me. That is where spark people came in.

I found spark people a LONG time ago, before there were any ads, and remembered the nutritional tracker.  I am also blogging about it here to keep me accountable for following it everyday. Luckily I am not very busy at work right now so it gives me some time to enter in all the food and add calories as needed, and to change some of the recipes that really don't fit in with my tastes.

My goals:

I will fit into my pre-pregnancy clothes by this summer

I will wear a bathing suit and look fantastic

I will feel great about myself everyday

I will have the energy it takes to love and cherish every moment with my two kids

I will have the energy and desire to spend quality time with my man

I will have time for myself to keep my sanity ;)

I do love my life and am very blessed, it will only get better!

Thanks for reading!

Have a great Monday!

Wednesday, January 4, 2012

Friendly caulking

Have you ever seen a home improvement show where they use caulk to make some painting jobs look seamless?  I have, and watch in envy because I always thought that I would make a huge mess if I ever attempted anything to do with a caulking gun.  I was right! and I was wrong! Both of which are a very good thing.

I love to learn to do new things, especially if by the end of it I become rather good at it.  Caulking is one of those.  Here are a few things I learned while caulking:

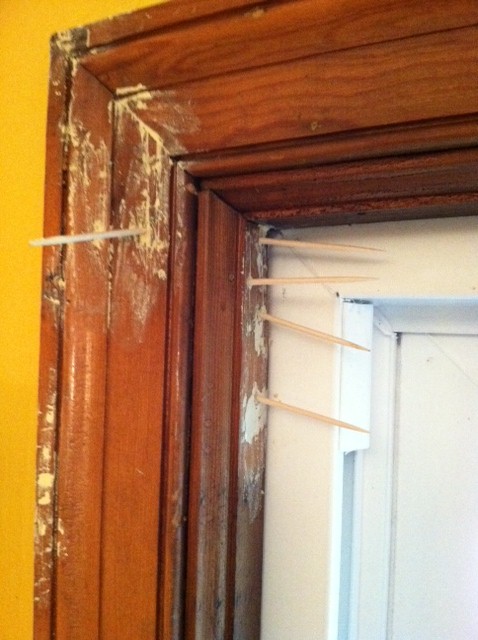
a: Since I was using the caulk on the window trim, I cut the caulking tip at an angle and as close to the tip as I could.  This made the bead of caulk as small in diameter as possible.

b; Start from the top and move downward at a very steady pace as you squeeze the trigger.  Make sure to have the pointy tip of the caulk at the top.

c; Once you get to the bottom or end of the piece you are caulking press the stop bottom.  This is very important!!!  If you don't do this the caulk will keep oozing out and you will end up with a big blob on your project and due to reflexes you will likely get a blob on your hand also!  (Yes...I admit this happened to me...quite a few times that I forgot to press it)

d; I found that my fingers did the best at smoothing down the caulk.  In the tough spots and corners I made sure that my fingers were caulk-free and a little damp so that I could smooth it down evenly.  I also cut my nails so I wasn't leaving little dents in the caulk.

Here is where I show you the difference that caulking makes.

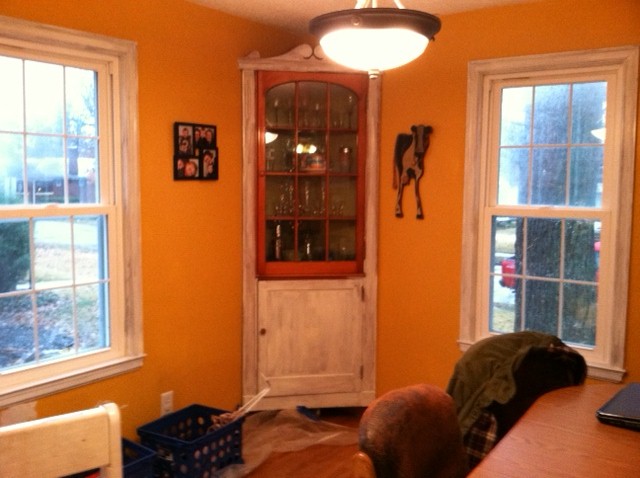
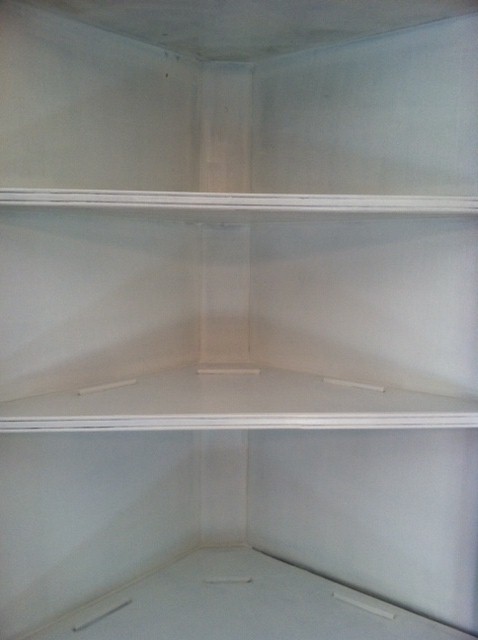
I used caulking on the windows, but what I really want to show you is the built-in.  See how it just sinks in the corner of the room.  It is so dark and dreary.  It was almost torn from the wall and trashed, but we decided to try some paint first.  So onto the first coat of paint, We didn't do the door at first, or the inside cause we were undecided on if we want to paint them a different color.


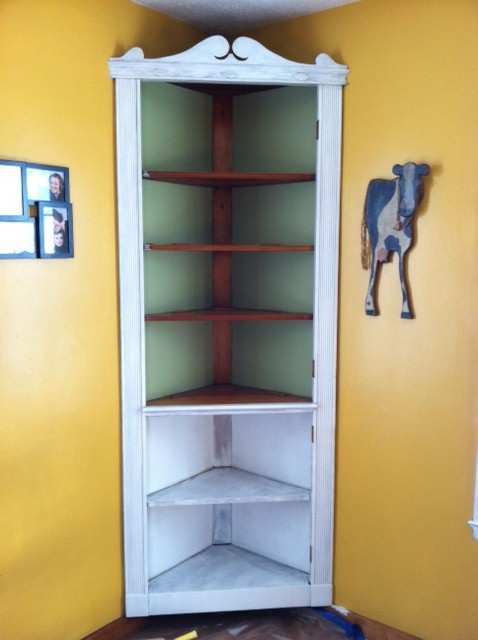
Here is the built-in with the doors off and the top inside portion not painted.
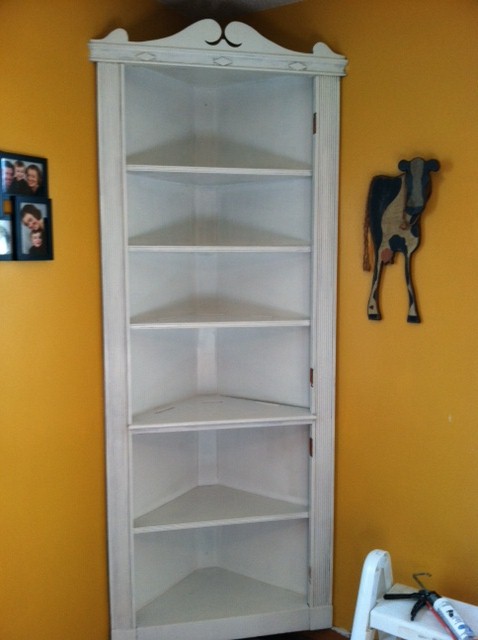
But then I decided to paint everything!
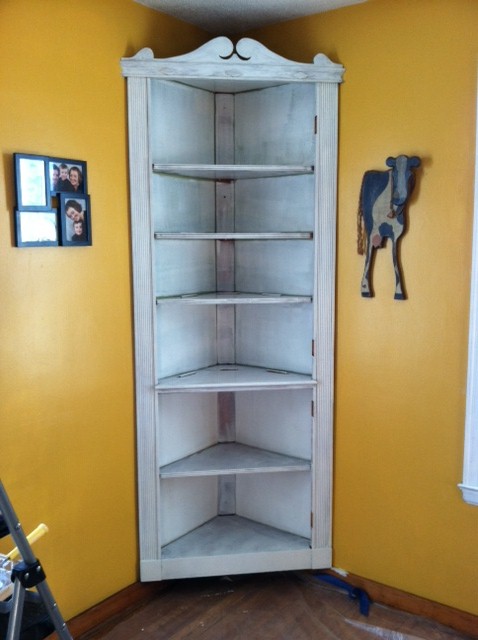
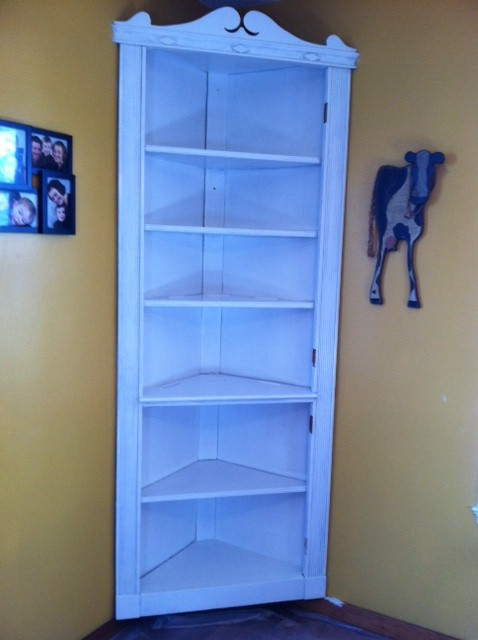
It is definitely looking better and better...don't you think? Just a few more coats of paint.  I believe the above picture has 2 coats on it right now.  The bottom picture shows 3 coats of paint.  I LOVE IT!

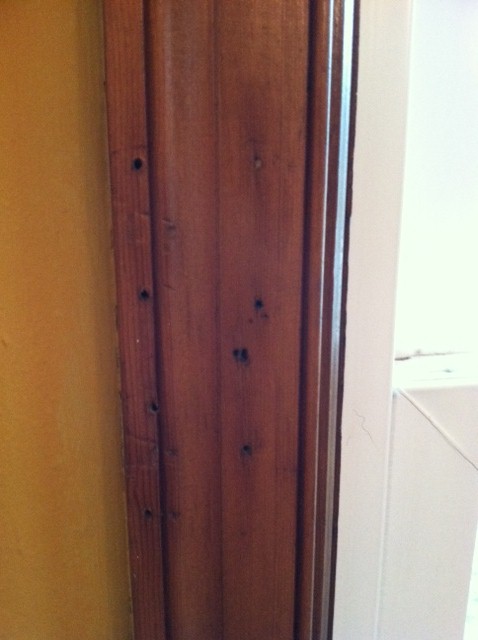
I did love it until I stepped back again and noticed this:
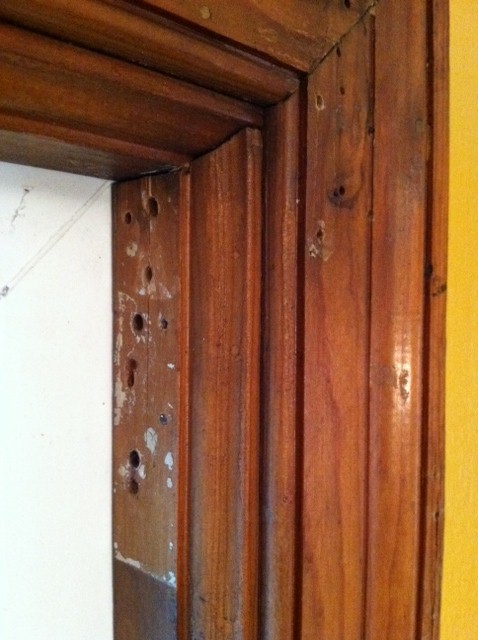
I don't like seeing all the gaps between the pieces of wood.  It says to me..."yes, I am homemade and not very well put together."  So off I went to explore the world of caulking.  I figured if I messed it up, at least it would be behind closed doors and my collectibles would also hide any mishaps.

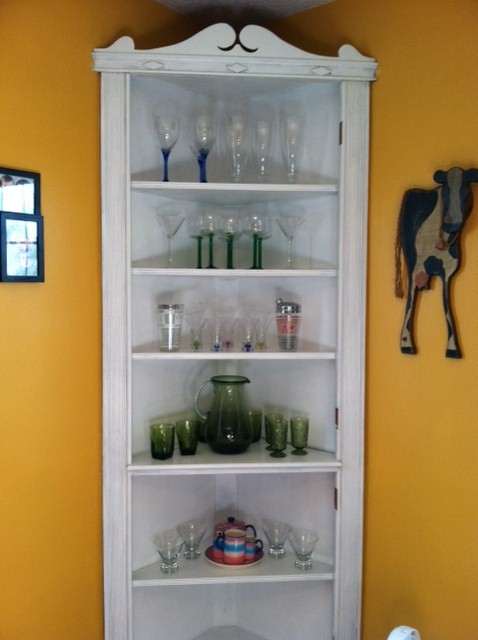
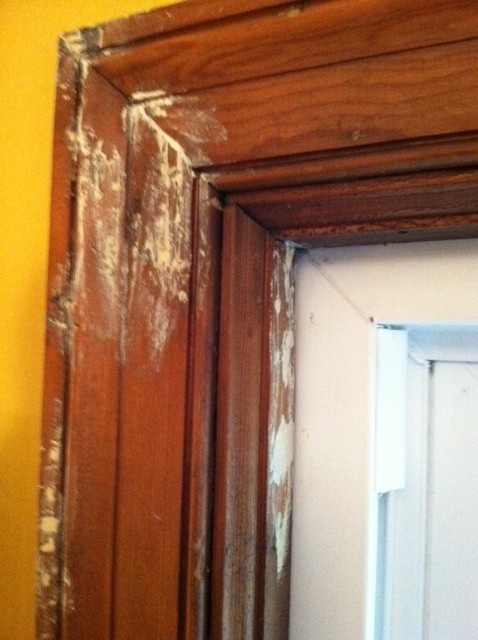
This is what caulking can do to a project:
SOO MUCH BETTER!!  The gap in the bottom right is very big and I didn't want to cut the tube any bigger til I was done with the entire built-in and the windows.  I love the results, and caulking is very easy.  Just go slow and try to keep your hands as clean as possible.

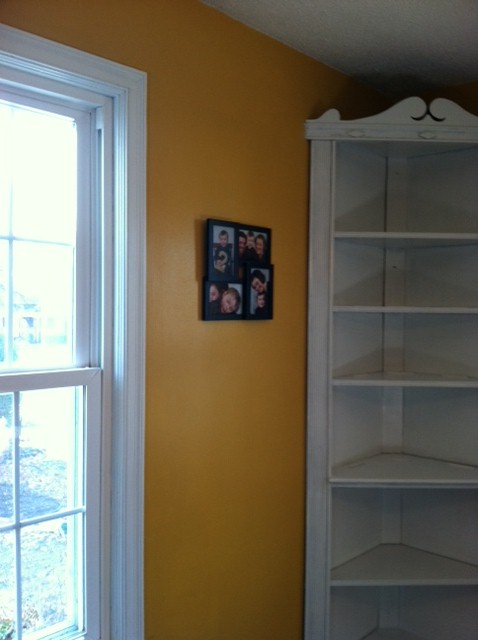
So here is the finished project, minus the doors.

Do you like?  Do you think I should put the doors back on or leave it open?  I would love to hear from anyone, please feel free to leave a comment!

Happy Wednesday everyone!!

Thursday, December 29, 2011

Toothpicks and painting trim

In that last few weeks of my maternity leave I decided that a week of it would be spent painting the trim and built-ins in our dining room white.  It sounds simple enough, right?

Wrong!

Painting trim is never easy, and if you say that it is than you are either lying to yourself or have never painted trim.  There is cleaning, sanding, patching, more cleaning and wiping and maybe more sanding and more cleaning.  You get the picture, don't you?

Here is our dining room before. (sorry about the bad picture but all of the pictures are taken with my iphone)

Please don't mind the mess, I am not a neat home improver, plus I was working on this while driving back and forth to daycare to nurse baby E, so time had to be spent painting not cleaning.

Our house is very small, I think it is around 1100 sq feet, and the dark wood trim just isn't working anymore. The trim makes every room feel like it is evening time, even when it is bright and sunny outdoors.  Believe it or not, the dining room gets the most sun.  I also think the windows are too skinny, but buying new ones does not fit in our budget.  But painting ALWAYS fits in the budget!

Now on to the first window.  Toothpicks and trim...bet you never thought you'd hear those two words in the same sentence.  My man is the one who had this idea, he read it in one of his handyman magazines.  Once you take off all the curtains, curtain rods, and nails, you are left with very sad looking trim.  What you want is happy trim, after all it deserves it!  The solution...toothpicks!

Here is sad trim:
more sad trim...
   Here is spiky trim
Here is trim getting happier

Here is very happy trim: (for some reason I can't find the close up picture I took of the corner...or maybe I forgot to, so this will do for now. This is a sneak peak to the built-in also)


The steps are simple, place a little dab of wood putty in each hole.  Then take a round wooden toothpick (very important, do not use plastic!) and place it in the hole.  Try not to move the toothpick around very much so the putty stays in place.  Let the putty dry.  Then take a razor blade, being extremely careful, and try to place it as flat on the trim as possible and cut the protruding toothpick.  You may need to add some more putty to fill in any gaps that may have occurred. Let the new putty dry. Then sand and wipe clean with a clean cloth.  Now it is ready to be painted!

Til next time!

Happy Thursday Everyone!

Tuesday, December 27, 2011

Getting creative for Christmas

Our daughter was born in August and last week was my first week back to work.  I don't know what I was thinking going back the week before Christmas!!!  It wasn't until the weekend before I went back to work that I even started on my Christmas gifts.

Why? you ask...

I really don't have an answer for you now because now it seems like I had all the time in the world, but I am pretty sure I have been exhausted the past 3 1/2 months that I have been home with a newborn and a 3 year old.  I started taking both kids to daycare to get them back into a routine before going back to work, but that still didn't help with my exhaustion-all I wanted to do was go home and go to sleep after dropping them off.

But I did start them and did finish them....at least for the local relatives, still have at least one (maybe two) more to make.  I saw these hand trees a while back and put them on my Pinterest account, and I LOVE the way they turned out.

I used old canvases that Nolan painted on but have been laying around waiting to be used for something.  I covered the fronts with burlap, wrapping it around and super-gluing it on the back.  Then using scrap fabric I had on hand, I cut out both the children's hands to make the trunk of the tree and bush.  I used Mod Podge to glue the "trunks" on the burlap, then cut out leaves and flower buds out of more scrap fabric I had.  Basically this project didn't cost me anything (except for time...which is a hot commodity with 2 kids) and I had so much fun making them.  I can't wait to make a bigger one to put up in our house!

Here is the before canvas painted by my son:


and here is the finished project.


Hope you enjoy.  Have a great Tuesday everyone!

Tuesday, December 20, 2011

Diaper Bag

While pregnant I stumbled upon a diaper bag like no other.  It wasn't pretty or chick, but I thought it was fantastic.  It is made from recycled truck canvases, with probably some other fabric added because I can't imagine a truck having bright colored flowers anywhere on it (unless it was for Starbright or Strawberry Shortcake).

I couldn't get a hold of any truck canvas, but I have a lot of fabric around the house that I could use.  I am not great at the sewing machine, yet, but wanted to try to make a diaper bag with all different fabrics.  I started the base of the bag and the sides with an old pair of jeans, and then just picked from the array of fabrics I have.  My bag looks nothing like my inspiration piece but I like it.  It is a bit bigger than I probably need but for now it will do.  I will call it a success!

Inspiration piece:
 and here is my creation:
  (without a pattern I think I did a good job, my next one will be much better!)

Happy Tuesday!

Monday, December 19, 2011

Stovetop cleaning.

Cleaning the kitchen...one of my least favorite chores.  It is very time consuming and can get messy very quick.  If you are like me and do all the cooking, it is nice to have some shortcuts to cleaning that actually work!  I don't know if I would call this a shortcut exactly, but it does wonders for saving some of that elbow grease to clean another part of your house.  I am talking about the stove top people.  All of the baked on black crud that accumulates on the burners and liners when you keep procrastinating about cleaning it.  I am that kind of procrastinator, and I did not want to even attempt to scrub the stove top in the despicable state that I had let it get to.  So off to the internet I went to find a magic potion...and I actually found one!

Ammonia!!

Just put the burners and liners in a XL zip lock bag with about a cup of ammonia and let it do its work overnight.  If your burners are anything like mine try to leave them in for at least 24 hours.  Some of mine could use another overnight since I use one side 90% of the time, but I am absolutely amazed at how they stove top looks!


As I am uploading these I realize that I don't have a picture of the entire stove-top done.  But it looks amazing!  I will post one soon.

I hope this helps some of you out that dread that task of cleaning the stove top like I do.

Happy Monday Everybody!